Feedback
Toegang via softphone
Aan de hand van de volgende stappen kunt u een softphone op uw computer installeren:
Hier vindt u een selectie gratis softphones:
- X-Lite (Windows und Mac OS X)
- Jitsi (Windows und Mac OS X und Linux)
- Ninja Lite (Windows)
- Linphone (Linux und Windows)
- Phoner Lite (Windows)
- QuteCom (Windows und Linux)
- Telephone (Mac OS X)
- Twinkle (Linux)
- Zoiper (Windows, Mac OS X und Linux)
In case you need help with adjusting the settings of the selected softphone, please observe the following step-by-step-instructions.
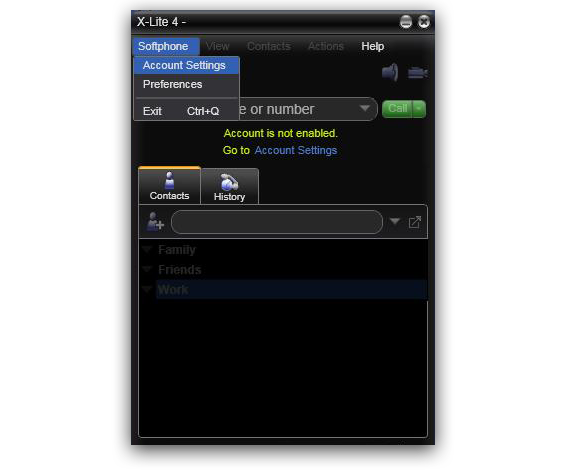
- Om uw account in te stellen doorloopt u de volgende instellingen:
- Om de instellingen aan te brengen, klik dan op "softphone" en kies "SIP-accountinstellingen".
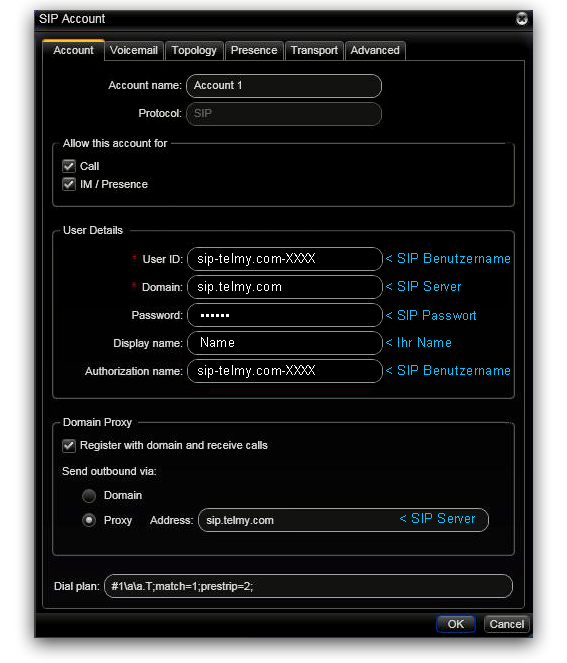
- Klik op "OK" op uw instellingen te bevestigen.

Stel onder SIP-account de volgende instellingen in:
User name: uw gebruikersnaam voor SIP
Domain: sip.telmy.com
Wachtwoord: uw gebruikersnaam voor SIP
Schermnaam: Geef hier uw naam in
Authorization user name: SIP-gebruikersnaam (nog eens invoeren)

- Om uw account in te stellen doorloopt u de volgende instellingen:
-
Start the application you have downloaded and installed.
Please complete the configuration for your softphone now.
To adjust the settings, please click "File" and select "Add new account...". - Now you have to choose SIP as your network to add a new account.
-
In your SIP account you can adjust the following settings:
- - SIP id → your SIP username + "@sip.telmy.com"
- - Password → your SIP password
- Please click "Add" to confirm your settings.


- Om uw account in te stellen doorloopt u de volgende instellingen:
-
Start the application you have downloaded and installed.
Please complete the configuration for your softphone now.
To adjust the settings, please click "Linphone" and select "Preferences". - In your settings click "Manage SIP Accounts" and then the "Add" button.
-
In your SIP account you can adjust the following settings:
- - Your SIP identity → sip: + your SIP username + "@sip.telmy.com"
- - SIP Proxy address → sip:sip.telmy.com
-
Please click "OK" to confirm your settings.
Last you have to enter your password.


- Om uw account in te stellen doorloopt u de volgende instellingen:
-
Start the application you have downloaded and installed.
Please complete the configuration for your softphone now.
To adjust the settings, please click your right mouse button and select "Settings...". -
In your SIP account you can adjust the following settings:
- - Domain / REALM → sip.telmy.com
- - Proxy Server → sip.telmy.com
- - Username → your SIP username
- - Password → your SIP password
-
If you click on "Network settings" on the left you can adjust the following network settings:
- - Deactivate "Use STUN server"
- - Activate "Use local SIP port (UDP)"
- - The Port should be "5060".
- Please click "OK" to confirm your settings.


- Om uw account in te stellen doorloopt u de volgende instellingen:
-
Start the application you have downloaded and installed.
Please complete the configuration for your softphone now.
If you start the application the "Setup Wizard" appears.
In your "Provider" settings you can adjust the following settings:
- Realm/Domain → sip.telmy.com -
In your "user data" settings you can adjust the following settings:
- - User name → your SIP username
- - Authentication name → your SIP username (enter again)
- - Password → your SIP password
- Before completing the configuration you can enter a profile name.
- Please click the check mark to confirm your settings.


- Om uw account in te stellen doorloopt u de volgende instellingen:
-
Start the application you have downloaded and installed.
Please complete the configuration for your softphone now.
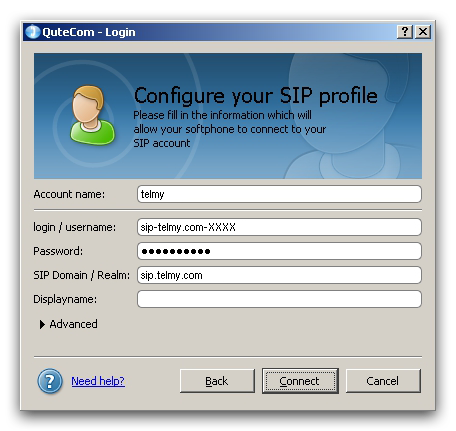
If you start the application the sip configuration wizard appears.
In your SIP profile you can adjust the following settings:
- - Account name → Please enter a profile name here
- - Username → your SIP username
- - Password → your SIP password
- - SIP Domain / Realm → sip.telmy.com
- - Display name → Please enter your name here
- Please click "Connect" to confirm your settings.

- Om uw account in te stellen doorloopt u de volgende instellingen:
- Zodra u de eerste letters van de gewenste contactpersoon (telefoonboek van uw Mac) ingeeft, worden er automatisch passende voorbeelden gegeven.
- Door op "Enter" te drukken begint het gesprek.
- Het gesprek wordt beëindigd door op het kruisje te klikken.
- Onder "algemeen" kunt u andere instellingen wijzigen in de toepassing.


Anders kunt u ook rechtstreeks een telefoonnummer ingeven via het toetsenbord.


- Om uw account in te stellen doorloopt u de volgende instellingen:
-
Start the application you have downloaded and installed.
Please complete the configuration for your softphone now.
If you start the application you have to configure a sip account.
The easiest way is the "Setup Wizard".
- Now you have to enter a name for the profile an click on "OK".
-
In your SIP account you can adjust the following settings:
- - Your name → Please enter your name here
- - Username → your SIP username
- - Domain → sip.telmy.com
- - Authentication name → your SIP username (enter again)
- - Password → your SIP password
- Please click "OK" to confirm your settings.


- Om uw account in te stellen doorloopt u de volgende instellingen:
-
Start the application you have downloaded and installed.
Please complete the configuration for your softphone now.
To adjust the settings, please click your right mouse button and select "Options". - In your options you have to chose "Add new SIP account" and enter a name for your sip account.
-
In your SIP account you can adjust the following settings:
- - Domain → sip.telmy.com
- - Username → your SIP username
- - Password → your SIP password
- Please click "OK" to confirm your settings.


